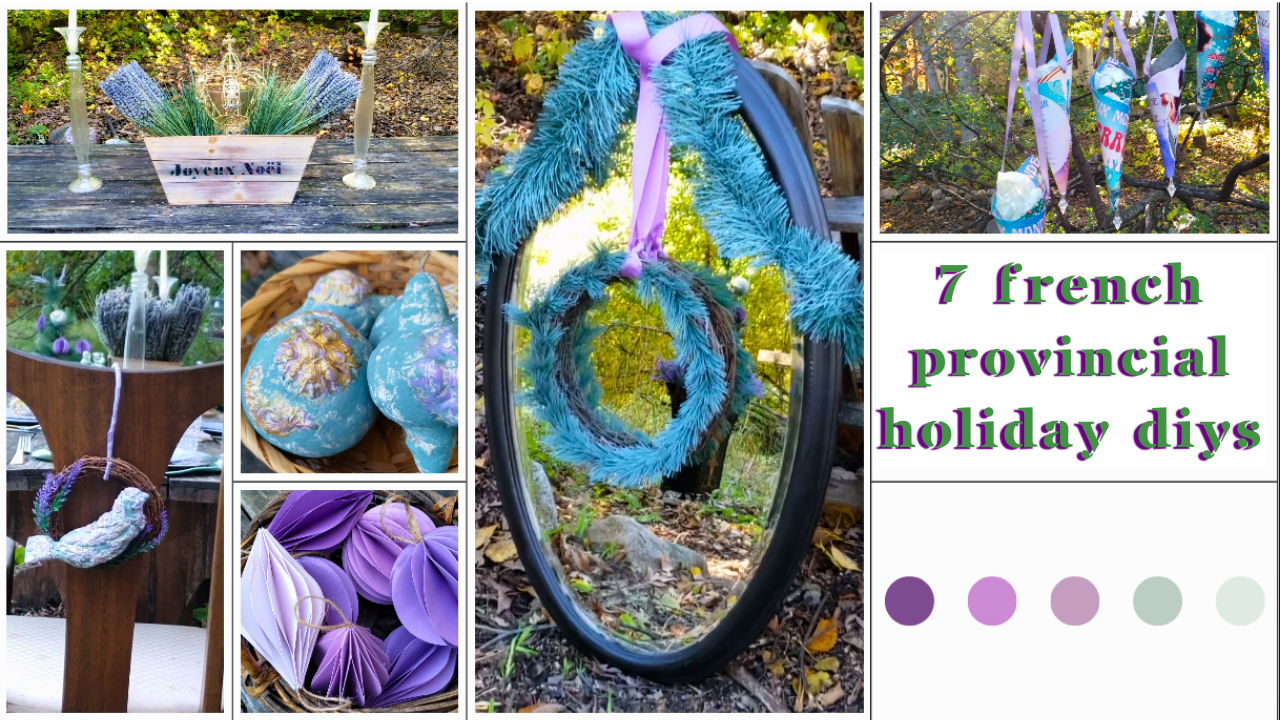
7 French Provincial Christmas DIYs
We’re getting ready for the holiday season with 7 French Provincial inspired Christmas DIYs. Back in July we presented four Always Uttori color stories with corresponding aesthetics. Today, we’re covering DIYs inspired by the Lavender and Seafoam green color story we shared in that article/video. We chose a French provincial or old world décor style to inform our color story. If you would like a refresher on this color story and style, be sure to check out the Christmas color trend article. Finally, if you missed our French Provincial Christmas Vignette video where we showed how all of the DIYs come together to create a beautiful Christmas theme, then make sure to check out that article!
Watch the video version of this article below or keep reading!
Thrifted Floral Box
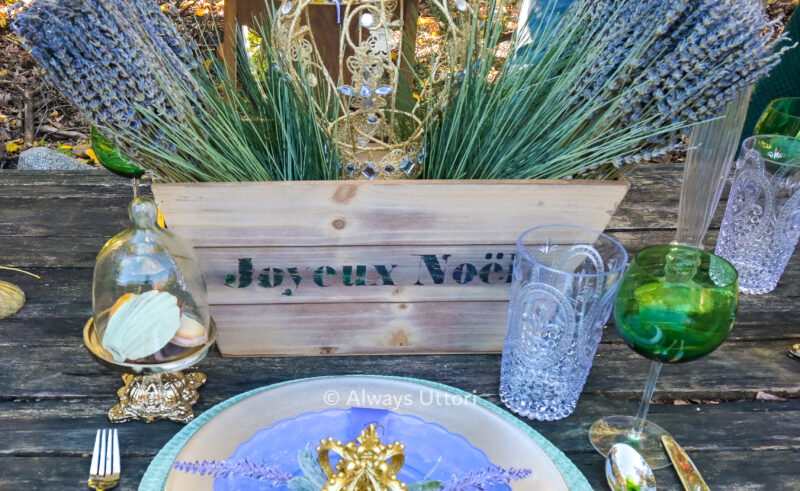
Every holiday table needs a centerpiece to bring warmth and beauty to the gathering. With a little creativity and craftiness, you can create a stunning focal point that will give your guests a lovely welcome. This project is simple and uses a rustic wood box as the vessel for a gorgeous floral arrangement.
To get started, you can try thrifting a wooden box at your local thrift store, or get one from a craft supply store. Look for something that has a rustic appeal and matches the size and style you have in mind. We found our box at Goodwill for $4.99!
Materials:
- Wood Box/crate of any size
- Low grit sandpaper
- Cricut
- Stencil vinyl
- Mod podge
- Paint brush
- Acrylic paint/chalk paint- I used purple and green acrylic paint and black chalk paint
- Dried lavender or faux lavender
- Faux pine
- Large crown ornament
- 1 strip of cardboard
Directions:
- My thrifted box had words on it, so I used low grit sandpaper to remove the painted words and then gave the rest of the box a quick sanding to allow for a more rustic and natural appearance.
- In Cricut design space, type “Joyeux Noël” with the font Annlie Extra Bold. Size it so that it will fit within the length of your box. Cut out the words on stencil vinyl following your circuit’s instructions.
- Weed and attach the stencil to your box.
- Paint a thin layer of mod podge over the stencil and box, then let dry. This helps to stop paint bleeding through the edges of the stencil.
- Paint a layer of purple paint, let dry, then cover with green paint and let dry. Finally, paint two coats of black chalk paint and let dry.
- Once it is dry peel off the vinyl.
- Lightly sand the letters to give it a worn and weathered look and to reveal some of the paint underneath. Use a damp paper towel to wipe down the surface after sanding.
- Fill the box with dried or faux lavender on both ends of the box. Fill the middle of the box with faux pine. Prop a strip of cardboard down the center of the box and place a large crown or other ornament in the center on top of the cardboard.
Dinner Plates
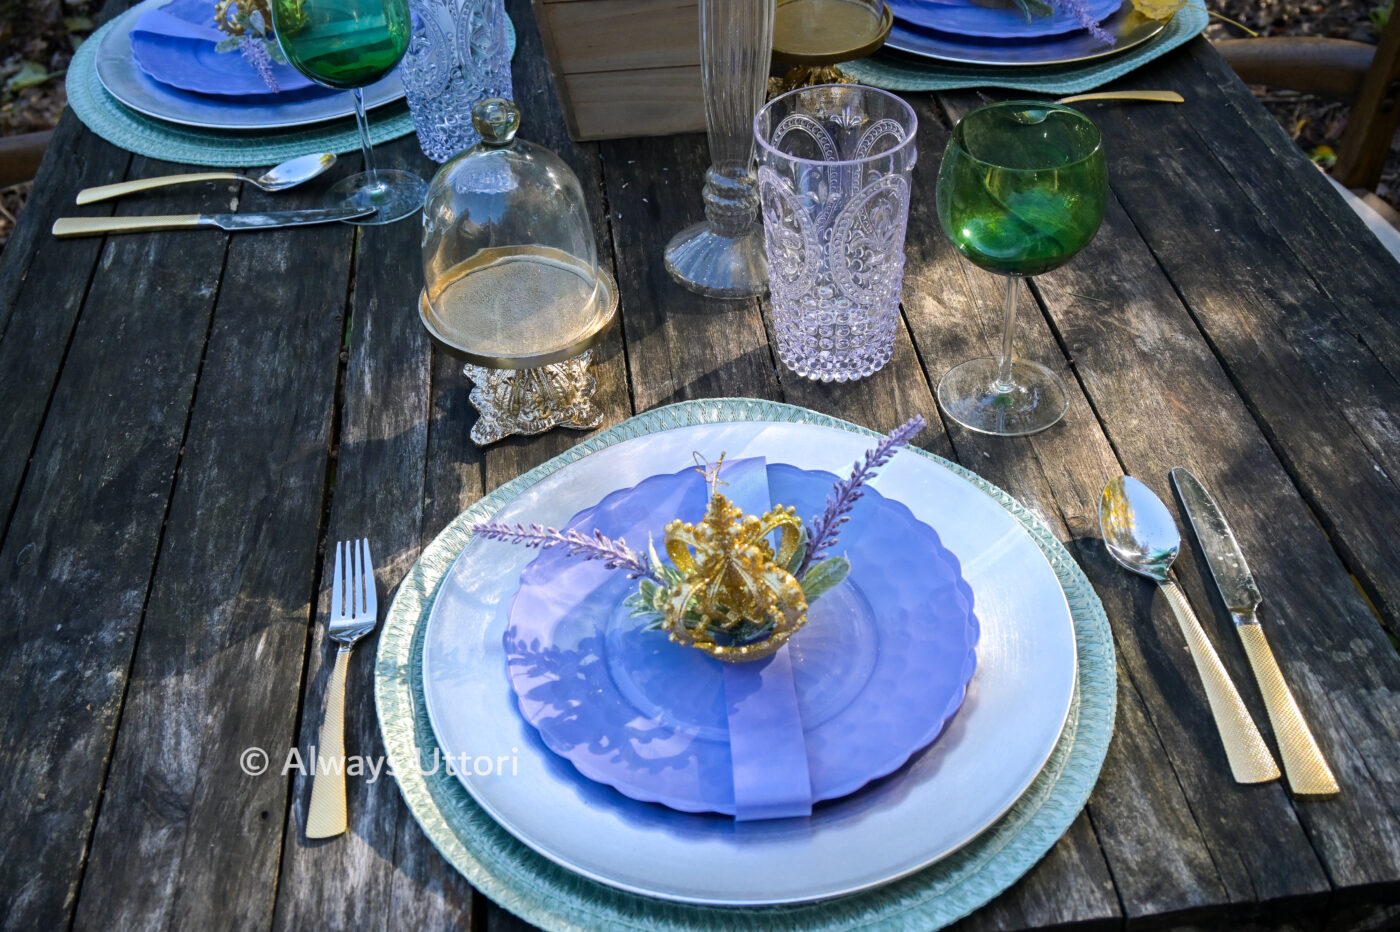
With the floral arrangement completed, I made a set of lavender dinner plates. Working with the theme of lavender and seafoam, I knew I wanted lavender plates of some kind. I didn’t see anything I liked available to buy, so I figured if I thrifted some glass plates, I could paint the back of the plates purple, and they would still be food safe. I thrifted these lovely plates at goodwill for $3.99 each. The plates had a slight blue tint, which I think further enhanced the lavender shade once painted.
Materials:
- Glass plates
- Purple Spray paint: I used Rust-Oleum spray paint in the color French Lilac, Satin finish
- Clear gloss spray paint
Directions:
- Make sure the plates are clean and dry.
- Spray paint the backside with a couple of coats of lavender spray paint in the color French Lilac, letting each layer dry in between coats.
- After the plate is covered to your satisfaction, finish with a clear gloss coat to help keep the paint from scratching off.
*I would be wary of washing these in the dishwasher and would recommend handwashing.
Paper Ornaments
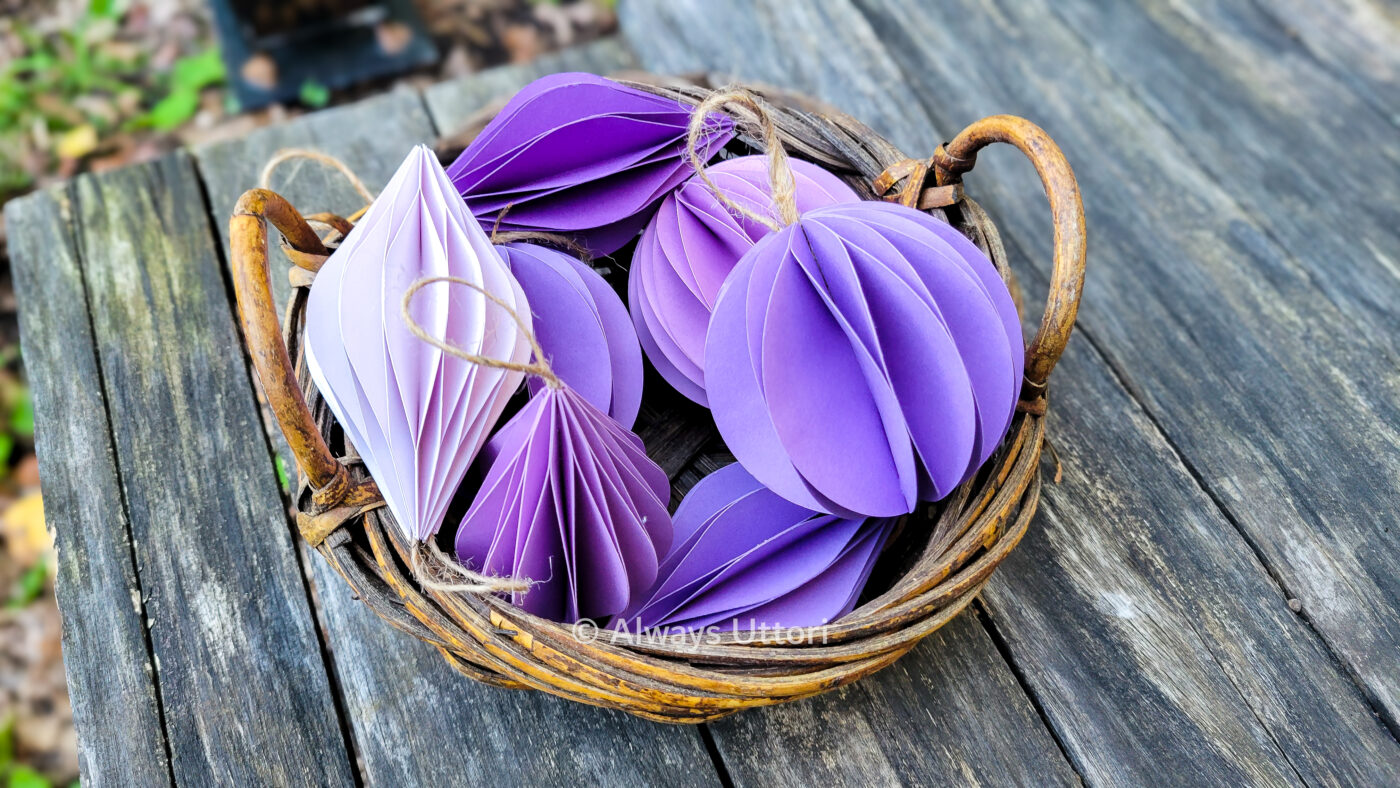
Our plates are finished. Next, we’re making paper ornaments. Paper ornaments are really popular this year and are available for purchase from many different retailers in a range of prices. I wanted to try my hand at making them myself, especially since I was working with a specific color theme.
Materials:
- 16 sheets of paper or cardstock (176 gms) in lavender/seafoam green colors
- Cricut or other cutting machine or a can and scissors
- Mod podge/tacky glue
- Paintbrush
- Twine or string for hanging
Directions:
*If you don’t have a Cricut you can also do this by hand. Use a can or other round object to draw a half circle and cut out the shapes then follow the rest of the steps.
- Open Cricut Design Space and select the half circle shape from the shapes tab. Change the height to be 3 inches. You can make yours bigger or smaller depending on how you want it to look. Variations in sizes may also look nice.
- Use the guides in the program to figure out how many half circles fit on an 8.5 x 11 inch sheet of cardstock, for me this was 5. Make 5 copies of the half circle and space them evenly using the alignment tool. Make 3 rows of 5.
- Next, select all of the half circles and click the attach button on the bottom right so that Cricut will cut them as one sheet rather than individually.
- Click the “make it” to send it to your Cricut. Decide how many ornaments you want and edit the amount in the copies box. Hit apply. I ended up making 4 in this style. I chose the medium cardstock cutting option. Feel free to adjust to the paper you’re using. Press the half circles out once they’re cut.
- To make the ornament, use glue or mod podge and paint a thin line down the center of the first half circle. Lay the next half circle on top of the first and align the two so that they’re flush with each other. Press for a few seconds, then place two dots of glue on the outer corners of the second half circle. Press for a few seconds. Repeat this process, alternating between the two patterns until all of your sheets are attached.
- When all half circles are attached, glue the back of the sheets together to help keep them secure. Cut a length of twine or string as an ornament hanger. I cut mine at about 5 inches. Make a loop and glue both ends to the back of the sheets. Let dry for a few minutes then press the two sides of the ornament together, ideally using a glue pattern that is opposite to the of the two ends. Press and hold for around 30 seconds.
Ornament Version 2:
- To create a long ornament in Cricut Design Space, select a circle and two triangles from the shapes tab. Arrange them until they form a seamless oblong shape then select the combine button and unite the shapes. Next, resize the shape to be 4 inches in height.
- Next, select a square shape and align the outer edge with the center of the ornament. Click the slice button to remove the other half of the shape. After that, copy the shapes until they fill the page. I was able to fit 16 on the page by adding two more shapes horizontally at the bottom.
- Click “make it,” to cut out 8 copies of the ornament. We’re going to double this one up for a total of 32 sheets per ornament.
- The pattern for this one is similar to the half circle. Start with one glue dot on the outer center, then, on the second sheet do two glue dots on both ends of the ornament. Repeat until all sheets are attached.
- Here’s where this ornament differs from the circle ornament, instead of gluing both ends together, we’re going to complete another set of 16 sheets following the same process. Once you have two sets of 16 for a total of 32, attach one side together with the glue pattern that is the next in the sequence of whatever side you’re attaching. Press and let dry for a few seconds.
- From here, the continue as before. Add glue to the back of the sheet, cut a length of twine and attach it to the center then glue the ornament together with the appropriate glue pattern.
Clay Ornaments
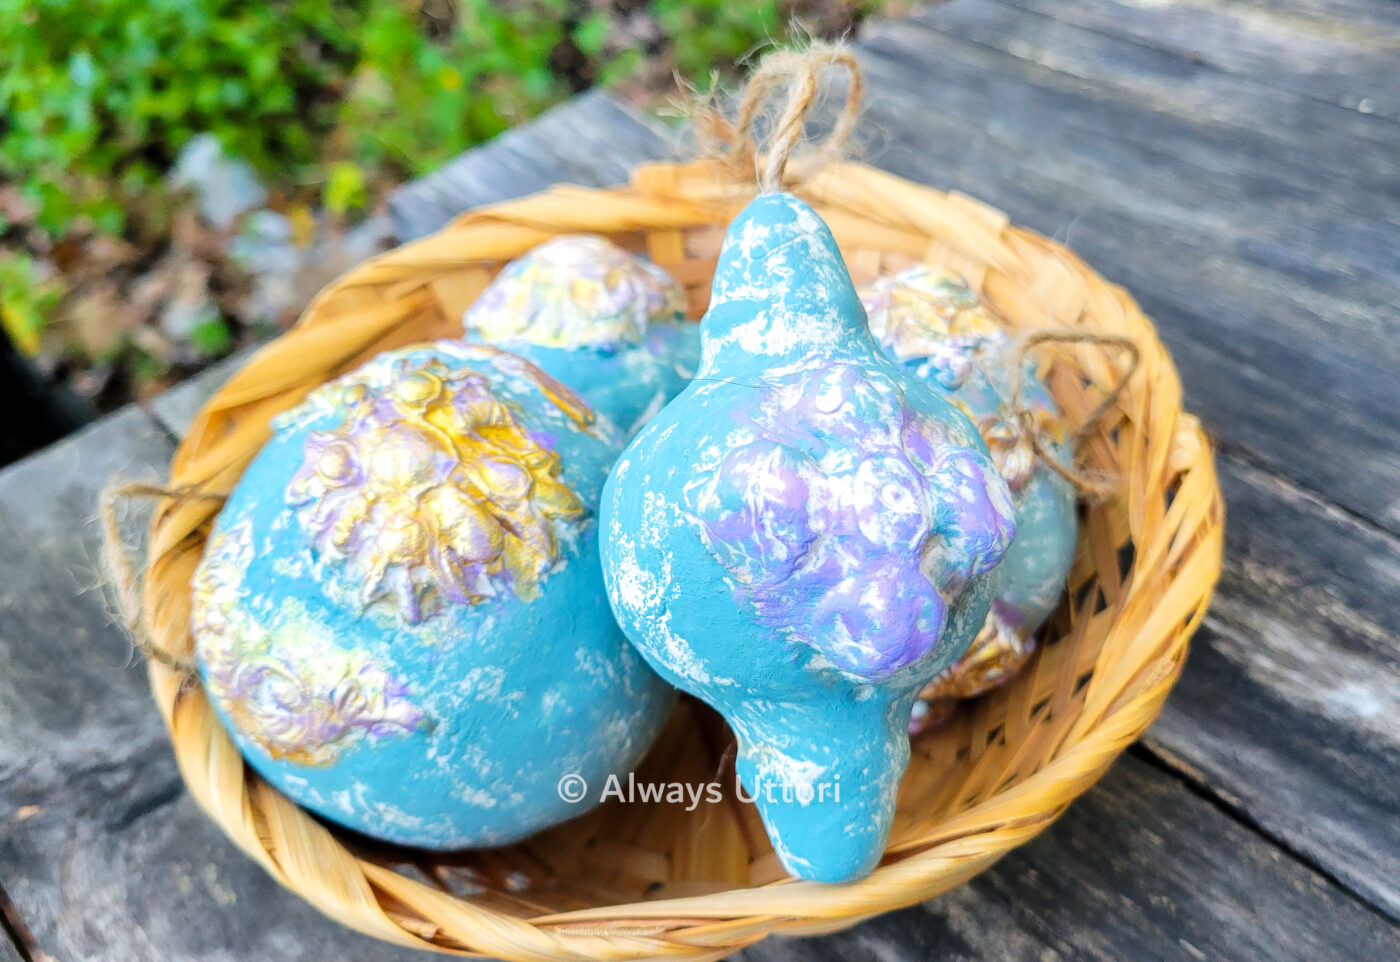
I was inspired by an ornament I saw on Pinterest from Home Branded, which was selling a set of 6 clay ornaments for $54 dollars. I thought the style would be perfect for a French Provincial style ornament. Clay ornaments might seem difficult, but they’re actually pretty easy.
Materials:
- Styrofoam Balls and/or Styrofoam finial ornaments
- Air dry clay
- Twine/string
- Filagree/finial shape silicone molds
- Cornstarch
- Scissors
- Glue
- Paintbrush
- Green paint: I used Rust-Oleum spray paint in the color Costal Sage, Matte finish
- Purple, brown, and gold acrylic paint
Directions:
- Cut a length of twine or string, then poke a hole in the top of the Styrofoam ornament with the back of a paintbrush, or something thin and sharp enough to get into the Styrofoam. Add a bit of glue. I used B-7000, but any kind will work, then add your string in a loop. While it’s drying be careful not to pull it out or jostle it too much, as you’ll have to reattach it later which may be difficult when the clay is dry.
- Next, take some clay and use your fingers to smooth it around the Styrofoam ornament’s surface. You can use a bit of water to help smooth out rough edges. Keep adding clay and smoothing until the ornament is covered completely.
- If you don’t want fingerprints or a rough texture, you can go back and smooth down with more water after the ornament is covered, but an uneven and textured surface plays into the rustic appeal of this ornament style.
- Once the ornament base is covered, it’s time to add embellishments. You can use whatever mold shapes you want, but since the theme is French provincial, I chose ones that looked a little more in line with a French aesthetic.
- When working with smaller molds, especially ones with finer details, the clay can sometimes stick and be hard to get out, so you can use cornstarch to help release the clay. Use a paint brush to lightly coat the mold before pressing the clay in. You can use scissors to cut away excess clay and then press the shape into the ornament. Use your fingers and water to blend the shape into the ornament base. I found that the back of a paintbrush worked well to get into the corners and blend the clay together.
- Press another piece of clay into the same mold and attach it to the back of the ornament.
- Continue the process for each ornament, adding shapes to the back and front of the ornament. If you feel your ornament needs more embellishment, as I did for the round shaped one, feel free to add additional shapes to the ornament.
- Once you’ve finished, let them dry. This can be difficult, as the clay can be a bit sticky and the side you lay it on becomes flat. For mine, I used the plate that put cornstarch on, and then placed the ornaments on the plate. I moved them periodically while they dried to avoid flat spots. Let the ornaments air dry for 24 hours.
- To paint the ornaments, I used Rust-oleum spray paint in Coastal Sage. I didn’t want full coverage, so I sprayed a small amount of paint in a cup (use a paper cup spray paint eats through plastic over time). Also, make sure you are in a well ventilated area or have your windows open when doing this.
- Don’t worry about covering every nook and cranny of the ornament with the paint. The ornaments are meant to appear rustic and worn. When you’ve covered the ornament surface to your liking, add a hint of purple to the relief. You can also add some touches of brown in the corners of the relief to give a more aged look. Finally, add some gold metallic paint mixed with a little bit of water on the relief to create the quintessential French provincial tension of opulence and rusticity.
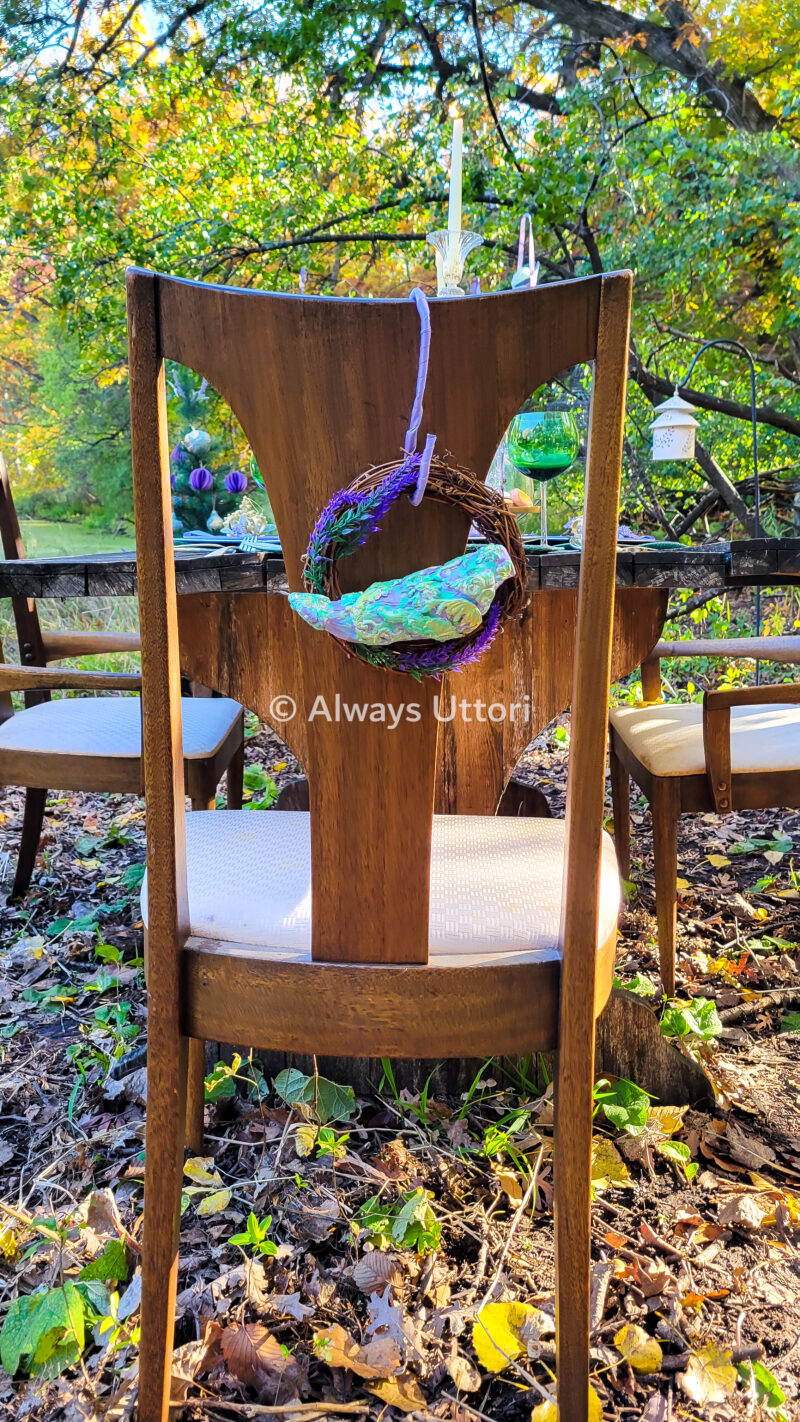
Filagree Bird Chair Hangers
This project is perfect to do around the holidays when you’re getting all your gifts in because it uses materials you would often throw away. I saved plastic mailers and packaging materials, but you can use any kind of paper, wrappers, or other disposable materials you have around. It’s hard to say how much you’ll need, but I didn’t use all the stuff I saved for the project.
Materials:
- Plastic mailers and disposable packaging materials
- Masking tape
- Tissue paper
- Glue/mod podge
- Water
- Paintbrush
- Air dry clay
- Cornstarch
- Filagree silicone molds
- Green and purple paint- I used Rust-Oleum spray paint in Costal Sage and French Lilac
- Gold acrylic paint
- 4 (14 inch) grapevine wreath forms
- 40 inches of aluminum craft wire
- Purple ribbon
- Artificial lavender
- Glue gun
Directions:
- To start, we need to form the materials into the shape of a bird. Fold up a small plastic mailer into a rectangle and layer with other materials until it is about 3-4 inches long. Form another piece to act as the head. Use your fingers to form the shape into a bird, which can be thought of as a round head that flows into a rounded chest, tapering into a narrow tail.
- Make adjustments as you go, by adding pieces to help you get the shape. The shape may not be perfect, but as long as you can get the general shape, it will be identifiable as a bird.
- Use masking tape to hold the packaging materials together and to give structure to the shape. You can also use the tape to create a sharp beak on the head which is important for creating a bird shape. Do this by wrapping tape around the head and creating a triangle where the beak should be. Use more tape to create a flared shape for the tail.
- Next, we’re doing a paper mache technique to give the birds a little more structure, so they won’t collapse when the clay is added. Mix glue and water together until it’s a thinner consistency. Then tear up pieces of tissue paper, or whatever paper you have on hand. Attach the tissue paper to the bird with the glue mixture. The goal is to cover the whole bird in 1-2 layers of paper for structure, but if there are dents or misshapen areas, you can fill them in by layering paper in those spots and improving the overall shape. Once you’ve got all of the birds layered with tissue paper, let them dry.
- Now we’re going to make filigree designs out of clay. To make the filigree, add a bit of cornstarch to the mold then press bits of clay into the molds. Use the same glue and water mixture to attach the clay. You can also use the back of a paintbrush to slightly blend the clay onto the bird. Overall, I found that using longer filigree shapes coming up from the bottom to the back of the bird worked well for mimicking wings and rounder filigree shapes worked well on the tail. Other than that, fill in the bird with shapes until it’s how you like it. Once it’s finished cover the whole thing with a layer of glue and water and let dry for 24 hours.
- Paint two birds green (coastal sage) and two birds purple (French lilac). Once dry, paint the the filigrees on the green birds purple and vice versa on the purple birds. Finally, add some gold metallic paint around the filigree edges and let them dry.
- Measure out 10 inches of aluminum craft wire for the hook. Bend the wire about 1 inch down from both the top and bottom, making sure the ends of each hook faced away from each other. Wrap lavender ribbon around the wire by overlapping as you move up the wire. Attach the ribbon at the bottom and top of the wire with a bit of hot glue.
- Next, hot glue the bird onto the bottom of the grapevine wreath. You can add faux lavender or other florals around the sides of the wreath.
- Hook the wreath and place on a the back of your chairs for a charming and whimsical addition to your holiday décor.
Paper Cone Garland
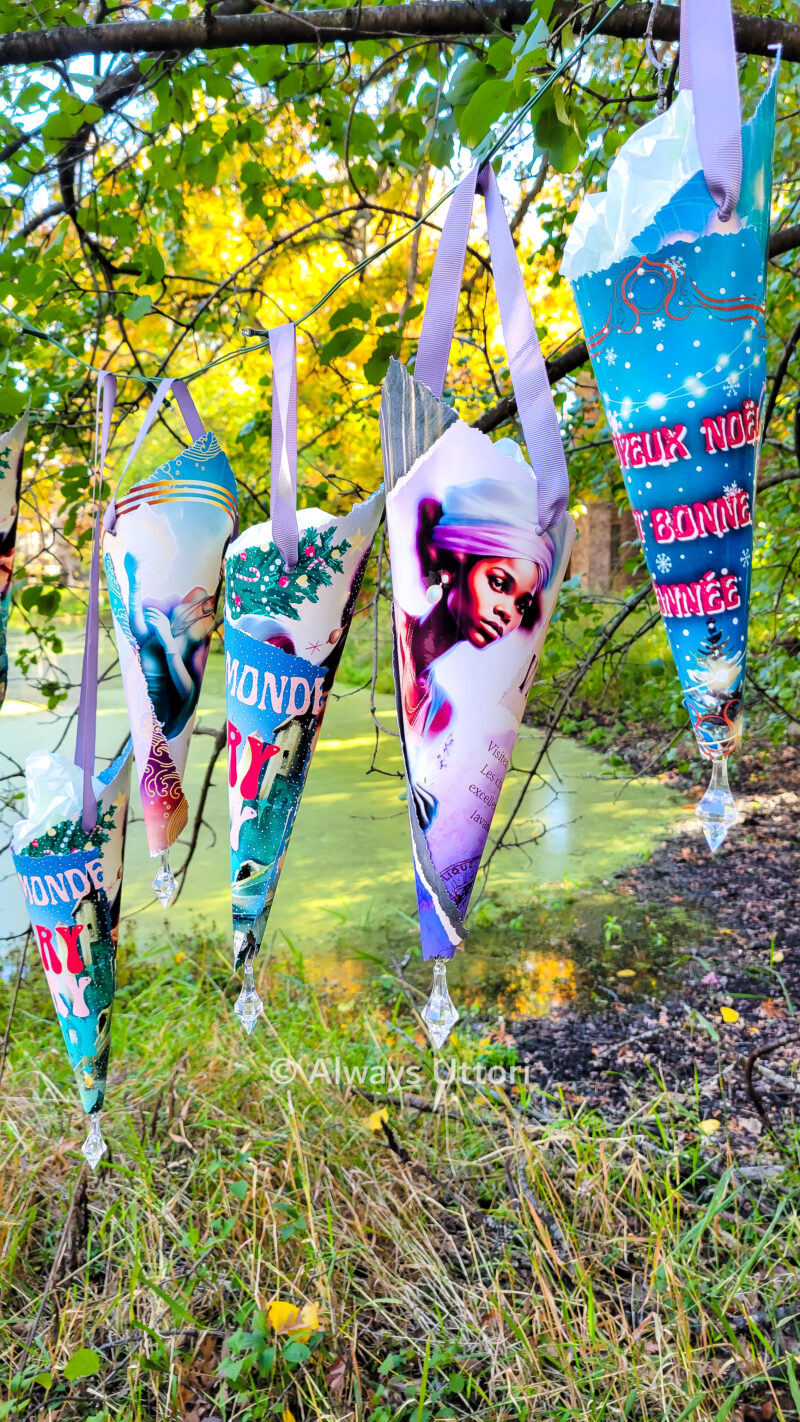
A paper cone garland is the next project. I struggled with what I wanted to do for a garland and ultimately decided on paper cones. The paper is an important element of the project, but I didn’t have many good options for paper that would work within the color story, so, my mom and I co-created these images using Adobe’s Firefly AI image generator and Canva. The images were created specifically for this project. If you would like to use these images for this project, or any other project you might do in the future, you can download the images below for free. The images are for personal use only, please do not sell or recompile them into other images as Always Uttori retains the copyright on them. All of the images will download as a set. The download will be in pdf format. To use an individual image, export the image into an image format (a png file is preferred over jpeg), and save in a directory.
Materials:
- 16 sheets of paper (8 sheets printed on photo paper and 8 printed on regular paper)
- Mod podge/glue
- Paint brush
- Crystal ornaments
- Tape
- Scalloped scissors
- Hole punch
- Purple ribbon
- Fairy lights
Directions:
- You can make paper cones with whatever paper you have, but if you do want to follow along with the images we created, I printed out one set on photo paper and another set on plain paper. Glue both images together facing away from each other so that the cone has color on the inside as well. Paint an “X” shape with glue and then go along the edges of the paper to adhere the pages together.
- Then, cut along the edges of the paper with scalloped scissors to cut off the print border.
- I found some small faux crystal ornaments lying around and thought it would add that touch of opulence if I hung them out from the bottom of the cones. Pre-roll the cone to get an idea of where the bottom will be, then before gluing the cone together, use some tape to attach the ornament hook to the paper.
- Roll the cone inward from the right side. You can make it as thin or as wide as you want. Use mod podge to adhere the overlapping paper and hold for a few seconds until secure.
- Next, use a hole punch and punch out holes on the left and right side of the cone. String purple ribbon through one hole and tie a knot on the inside of the cone to secure the ribbon. Cut the ribbon to any length you want and then string through the other hole tying a knot on the inside of the cone. I made my cones with varying ribbon lengths.
- I ended up stringing the finished cones on some fairy lights.
Wreath
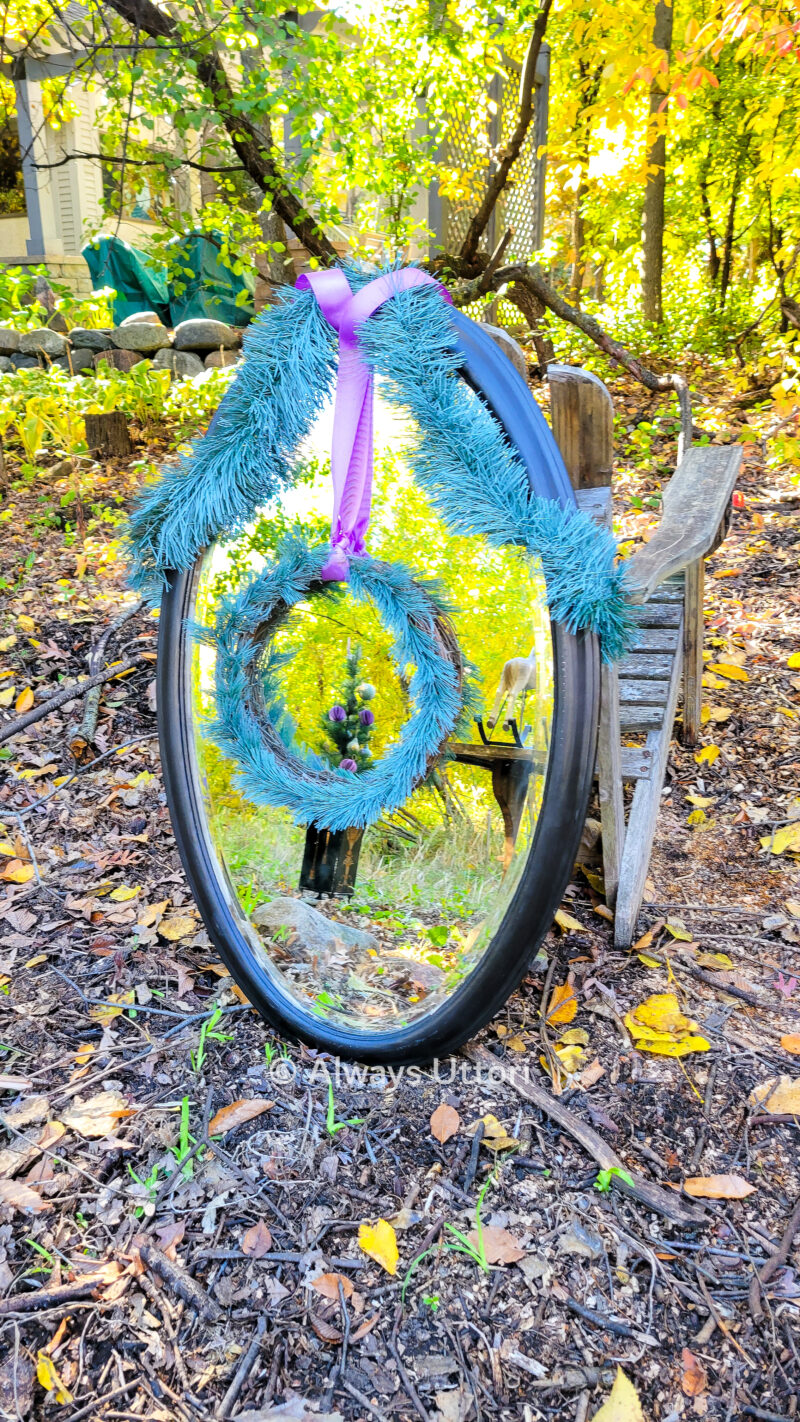
Our next project is a wreath. This simple wreath evokes French aesthetics with a simple vine wreath form and no ornamentation except a bow.
Materials:
- 14 inch grapevine wreath form
- 22 pine picks or fresh greenery (our is thrifted, but you can easily find on amazon)
- Garland
- Purple ribbon
- Coastal Sage green spray paint
- Glue tape
Directions:
- Tie ribbon in the center of the wreath as a place holder.
- Place pine picks in the wreath form in a clockwise direction. You may secure the picks with hot glue if you wish, but mine were secure enough without hot glue. Add picks until the wreath is full, and you’ve reached the other side of the bow.
- If you want to hang the wreath on a mirror measure a length of garland against the mirror you plan to use. Cut the garland to drape from the top.
- Remove the bow from the wreath and spray paint both the wreath and garland lightly with coastal sage green spray paint. Let dry. Tie bow back in the center of the wreath.
- Hang in a window or on a mirror. To hang on a mirror, use glue tape to secure the garland on top of the mirror and to tuck the garland behind the mirror. Use the same tape you used to attach the ribbon to the mirror for the wreath.
Conclusion
That’s it. Our DIYs for a French Provincial Rustic Christmas in Lavender and Seafoam.
We hope these 7 French Provincial inspired Christmas DIYs have inspired you to create your own holiday theme with this color story. If you want to see how these DIYs look together in a beautiful vignette, don’t forget to check out our article where we share our final result. Also, keep an eye out for the final part of this series, where we share our recipes for a French Cookie Flight. Happy Holidays from Always Uttori!