Hey, Femme Dangels, we’re back with 4 D-I-Y projects that you can make for yourself, or give as gifts to your friends this holiday season. I’ve been watching Youtube, and trolling Pinterest for ideas and, while I applaud all of the talented crafters out there, it’s not me. So, if you’re looking for Martha Stewart, go here. . . If you want something you can throw together for a friend who understands that the very fact that you made the effort means that you care, welcome. I’m SoNotMarthaStewart (but I do so love her). Anyway, read on for 4 super simple I Do So Love You, But I’m So NOT Martha gifts that you can give because you care enough to throw a little something together
Cute Crafty Candles
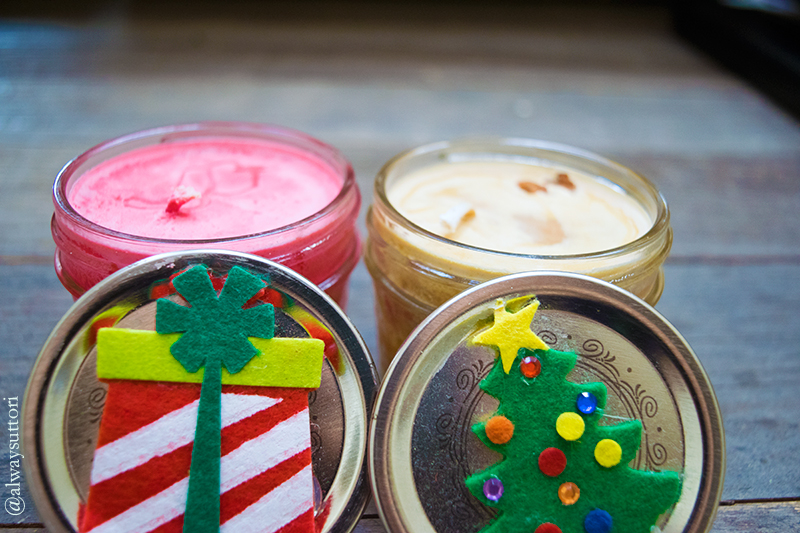
4 cups of soy wax
4 wicks
4 small mason jars
4 clothes pins
1 tsp candle scent of choice (optional)
Half block of wax dye (optional)
Set your mason jars out, and put a wick into each, using a clothes pin to secure the wick in place. If wick is too long, you can cut it down to size and save the rest for another batch.
In a heat-proof container, one that you don’t mind designating as candles only, melt the wax over the stove, stirring occasionally. Once wax is melted, add color block, if using. Once combined, remove from heat and add scent, if using. Carefully pour melted wax into the prepared mason jars. Let set about 2-3 hours. If you have used scent, you’ll want to put a lid over the mason jars and let them cure for about 2 weeks. This ensures that the scent will be strong when the candle is lit. If gifting, let friends and family know to leave the lid on for 2 weeks. If no scent was used, this isn’t an issue, and you can burn or gift away. Additionally, you may wish to add decorations or bows to the jars, as I’ve done, to make them more festive.
Christmas Choker
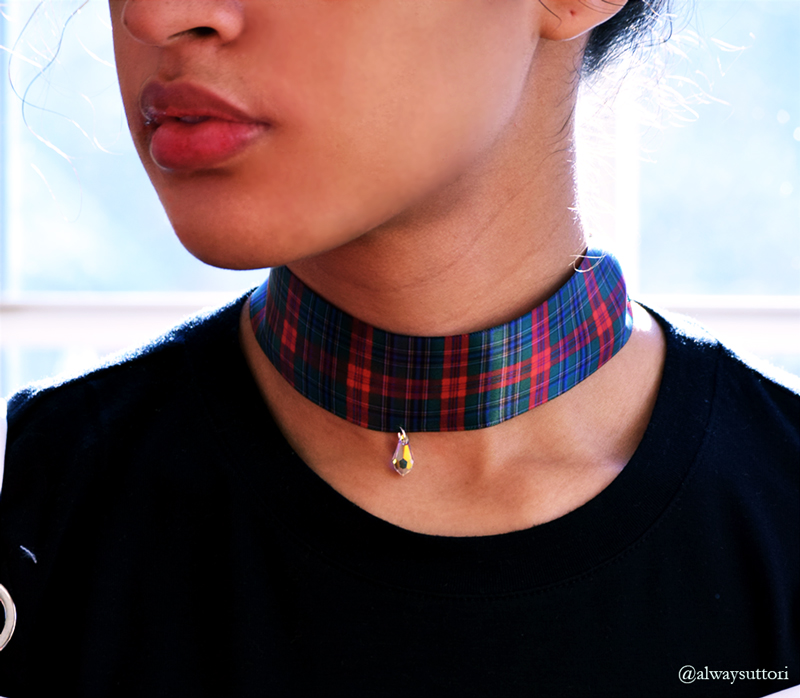
We’ve done chokers before. This one uses the same technique as the previous one. Click here for full instructions.
To make the modifications,you will need:
Ribbon of choice
Small jump ring
Small gemstone with hole
Pliers
Once you have completed the main choker, as the directions explain here, you can poke a small hole into the center of the ribbon near the edge using the jump ring. Attach the gemstone to the jump ring and then close the jump ring. Quick. Easy. Christmas chic.
Fashion Bow
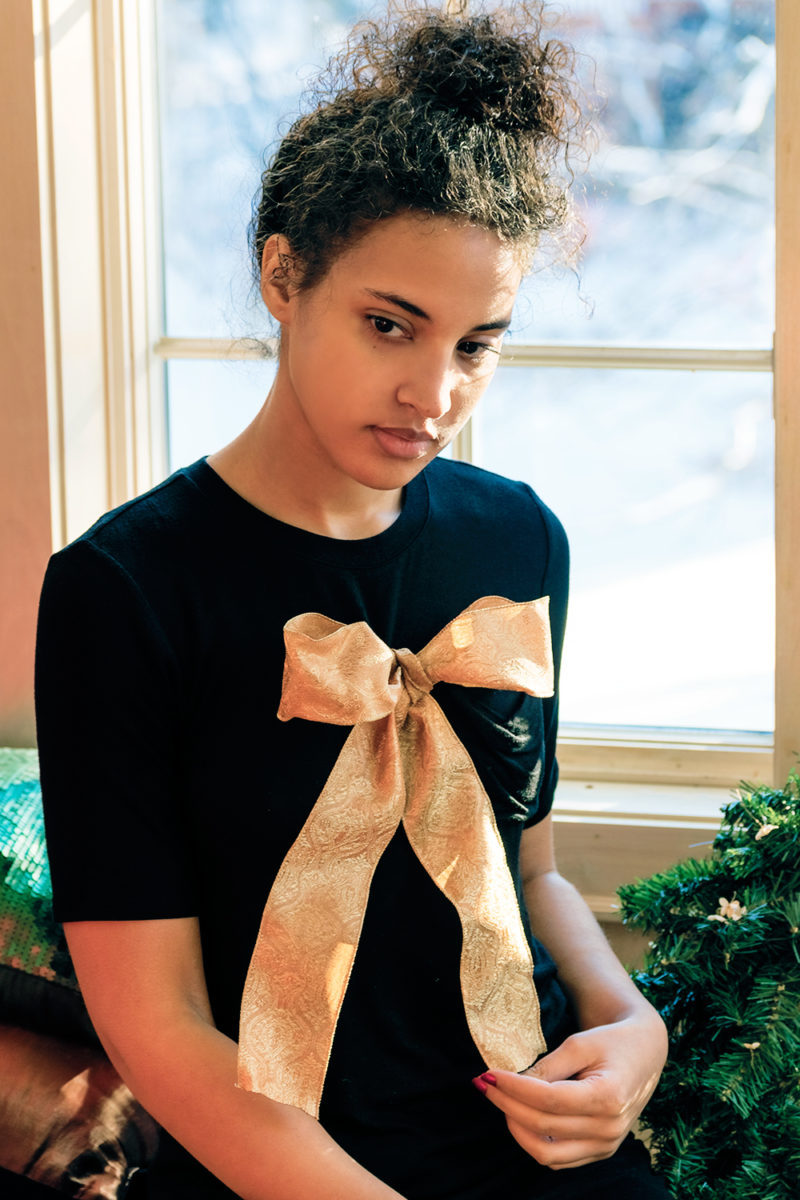
Yeah. It’s just a bow. In fact, my bow is a bit of a phone in, because I’m not that much of a bow person. I may circle back around to this craft with better ribbon at some point, but I just wanted to share the craft with Uttori readers. Why? Because these bow pins are an up and coming trend, and they can be very expensive – ($1,295 at Nasty Gal). I used Christmas ribbon, because I wasn’t all that serious about keeping the bow, but to do it like the expensive ones, you need a ribbon that’s about 2.5 inches in width. If you have a fashionable friend, or you want to sport your own fashion bow pin, follow the instructions below. Talk about super easy!
Ribbon of choice (You can buy Chanel ribbon on Etsy, though I have not, so cannot give any suppliers. Just search for Chanel ribbon on the site).
Scissors
Pin baking or safety pin
Hot glue gun
Lighter
Tie the ribbon into a bow shape. You may wish to use your finger as an initial guide then tighten the knot after the bow has been tied. It’s up to you how long or short you want the bow to be. One the bow has been tied, cut off excess ribbon. To make sure the ribbon won’t fray, run a lighter over the ends of the ribbon. Be careful not to catch the ribbon on fire. If your ribbon has wire in it like mine did, be sure to snip down the wire so that it doesn’t snag on things.
Next glue the pin backing or pin the safety pin to the backside of the bow. Once the glue has set, the fashion bow, and you, are ready to grace the pages of Vogue.
Upcycled Jewelry

Do you have any necklaces that you don’t use anymore? Or maybe a pair that are broken? Consider upcycling them into earrings. Mismatched statement earrings are in, and they make great gifts. For the set pictured above, both my mom and I happened to have the same necklace bought ages ago from some cheap jewelry place. Her chain was broken; the clasp on mine was broken, but I still liked the pendant. Quick fix, added some earring loops and instant upcycle!
Earring hooks
Broken, old, upcycle jewelry of choice
Jump rings and or glue
Depending on the items you have, you may need to glue them to an earring back. My necklace pendants already had loops, so I simply attached two jump rings and two earring hooks. You can’t even tell they used to be necklaces!
I hope you enjoyed these super simple Christmas crafts. I could have called this the Lazy Femme’s Guide to Christmas Crafting, but is it really being lazy? The holidays are about enjoying each other, not about things. So show them you care by coming out of your room, and giving the best gift of all, your time and attention. Happy Holidays, and thanks for reading.